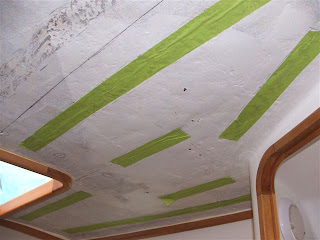
 I have taken a few snaps to show the process involved in attaching the headliner, as that seems to be all I've managed to do lately. The first step is to survey the deckhead and decide where the velcro needs to go. I have had to allow for lots of bumps, remember to allow for wrapping the vinyl-backed foam around the edges of the sheet, and work out how much you need to hold it all up. I use 2" masking tape to get a good visual, then mark around the edges and measure it all.
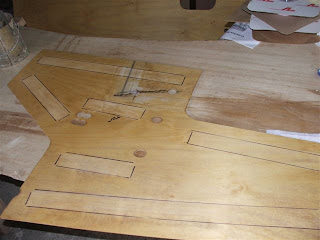 Next the hook side tape is stuck on to 2" ply strips, stapled and the staples bent over to ensure everything stays together. Then these strips are used to mark the position on the headliner ply, which is then given a sand to key up for the loop velcro.
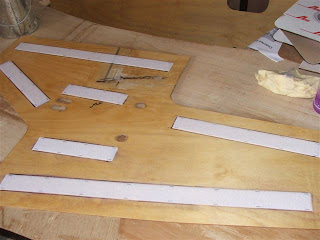
The loop velcro then gets stuck down and stapled, staples bent over and we are nearly there.

The hook strips are then pushed on to the loop and we are ready to glue it up. I put dabs of epoxy every 20-30 mm along the hook strips and push the whole headliner up into place. Toms are used with ply offcuts to spread the loads and once the epoxy hardens, we can peel the headliner away from the hook strips and proceed to add the foam-backed vinyl. Done! It is quite a simple process, the most onerous part being bending the staples over to ensure a good, solid bond to the plywood.


 I have been busy completing the plumbing for the head area, which is now only waiting on the fresh water line to the vanity sink and the breather for the holding tank. There isn't much to see however for a lot of contortion work...
 I have been trying my best to keep everything as tidy as possible but I am not completely happy - I wish pipes bent 90 degrees more easily!
 Bill was doing his own stuff for a while, but has added the plinth for the binnacle. That is foam and glass, glued to the cockpit floor. I still need to get the binnacle painted but I am considering powder coating it, I need to check that it won't blow the epoxy bog off the aluminium when they heat the powder.
 Looking a little like a Star Wars fighter, the forward cockpit coaming is coming together and should be finished soon. Bill has cut out the speaker holes and added a wiring conduit so we are ready to go!
 There's a movie where one of the characters just keeps saying "and then?" until chaos ensues. Just how I feel! Progress appears incredibly slow currently as we do a host of little jobs. Geoff the sparky has almost finished this phase, he will need to return once the painting is finished and we have laid the lining on the exposed parts of the hull. I am painting the aft cabin but the weather has been cold and damp lately so that has been slow. Today looks good so I'm into it in a moment!
 Bill is rocking on with the forward cockpit coaming. It looks high until you put the instruments in place above the hatch, which then brings everything into perspective. Construction is quite simple but I am glad he is doing it, there are a few tricks of the trade he brings along which make it look easy.
 The foam is glassed inside and out, he is doing that in the garage before the final attachment onto the boat. We will be making the hatch turtle strong enough to jump on, so there will be a bit of trial and error there. Elsewhere in the boat I have mounted the cabin lights, 12 V sockets, switches and some of the fans. Parts of the boat look finished - if you hold your head right and concentrate...


 So, Bill has started on the gas locker and very exciting that is too. We will build the surround from foam and glass, the lid will be 12mm ply, glassed over for strength and hopefully stability. I have not had any experience with building with foam but it seems quite good, at least Bill makes it look easy!
 Otherwise, when not in bed recovering from the early winter round of flu, I have been punishing myself with plumbing in the generator and main engine. I took this photo a few days ago, every day I try and get something added, although by the time I have a) worked out what I need to do, b) shopped for the parts and c) taken them all back at least once and got the right size, progress can be a little uneven.
 The scuppers are all in and glassed, not a major job but interrupted by Christmas so it is great to have them all finished off. They look excellent and will look perfect when painted. Bill also tidied up the 2 original ones as they had not been done that well - who would have thought!


 Progress has been made steadily and we have tidied up some jobs that will allow me to proceed when Bill is not here. We added the wood trim and the ply headliner in the walkway, so I can finish all the outstanding painting forward of the engine room bulkhead. We also sprayed the head counter top and the companionway shelf and that came up well.
 I fitted the Chatfield Marine Blue Water Shaft Seal, the picture shows the old prop shaft sitting in place through the Vesconite cutless bearing. The Vesconite bearings were very simple to fit, I just put them in the freezer overnight and they just tapped into place.
 The engine is sitting down on the modified beds again, it looks like it will line up well this time. I have now removed the rusty old RSJ from the boat and it looks a little less industrial.
 The additional scuppers have been cut and I have sealed them in preparation for the PVC pipes that will be epoxied in. As we have come to expect, there were large voids in the hull/deck join, I have poured in quantities of thin epoxy glue so I hope it will all stick together. I am less surprised as time goes on, with regards to the amount of movement in the boat prior to refitting. Hopefully we will not hear any large cracking sounds when we float! The stanchion bases are all fitted now and we are ready to glue the rubbing strake on when the time is right.
 The shower is getting closer to completion, we have nearly finished fairing the coachroof. We decided to simply use epoxy fairing compound as there will be no possibility of any rot in this wet area.
 Well, finally got my act together and put the engine in. It was delayed a bit by the need to line bore the shaft log. I had long been suspicious that the cutless bearing at the aft end was not aligned with the shaft, judging by the various damage marks on various bits. I was also disappointed by the fact that the forward end was not round. The supplier of my new cutless bearings suggested I line bore the shaft log to ensure a proper fit and I think it was good advice. I was at school camp with my son Will when the guy turned up to do the job, but he sent me some photos - along with the bill! The aft OD for the bearing is 2", the forward one is 1.75". He also lined up the hole in the aft engine bulkhead and that will help us in aligning the engine.
 Putting the engine in place was pretty straightforward, although I had to cut a hole in the roof of the shed/tent, as the hiab that I had to put the engine in was much bigger than the one we used to take the old Perkins out. I have had the exhaust riser modified to fit, however I need to cut the modified engine beds down a bit as I managed to make them too high... hem hem! We will be able to use a chain block to lift the engine out of the way, I have a 3.5m length of RSJ that will fit across the cockpit. Hopefully more soon, maybe not much this week as Will has 3 games of cricket for his school and we will be going along on Thursday to see New Zealand play Australia.
